Bkgd

Showing posts with label Tutorials. Show all posts

Friday, October 11, 2013

Fondant Animal Cake Tutorial

So far I have three boys and two crazy-elaborate traditions that I do for them: Halloween costumes & birthday cakes.  Which is funny because before I had kids I'd hardly ever used a sewing machine and didn't know the first thing about making cakes, elaborate or otherwise.  I claim good genes - my grandma had both of these skills in spades, so even though she never sat down and taught me either one, I must've picked them up from her genetically.  

So, back to cakes.  I just want to say that anyone, wait I mean ANYONE can make a cake like this.  Seriously, if you played with play-doh as a child, you have skills enough for this.  It's easier (and more fun) than you think.  You, too can impress your family & friends (and especially the kiddos).  

Step 1 - Preparing the Fondant 
You will need to make your fondant a whole day before you make your cake because it has to refrigerate overnight.  I like to make my kids' cakes the day before their birthdays so I'm not in the kitchen going crazy the day-of or night-before - (as I was when I did this cake) so I now make the fondant 2 days before a birthday.  

Now, be aware: Marshmallow fondant is super easy to make and very tasty but also very rich.  I, personally, do not like to drape my cakes in fondant because while it certainly looks gorgeous it's not as tasty as the frosting I usually make (Fannie Farmers Confectioners Frosting II) - so I compromise by using regular frosting on the cake and decorating with fondant animals.  A win-win!


For my Penguin cake I knew I would need a significant amount of black & white.  I also needed some yellow for beaks & feet and some blue for water.  

I recommend starting with your lightest color first because the food coloring tends to stain your hands.  Especially black, as you can see here.  My hands were faintly black for a couple of days after this.  Some colors (like yellow, light blue & green) do not take much food coloring to get a nice solid hue but others like black & red take a lot of coloring because each time you knead the color into the fondant they turn gray or pink.  Persevere!  

Here you can see my little balls of colored penguin fondant all wrapped up and ready for bed in the fridge.  


Step 2 (the next day) - Fondant Bodies & Feet
You'll notice I left out the step where you make your cake.  I happened to use one of the Fannie Farmer Cookbook recipes for this cake (but any recipe, boxed or homemade) will work just as well.  Since I wanted a snow bank and a lake, before I frosted the cake I carved out and hole in the middle of the cake, filled that in with frosting and used the carved-out cake for my hills.  I made my frosting very soft & spreadable to look like snow and it later set into a nice solid frosting.  

Here in the above picture you can see I have already flattened and inserted my blue fondant lake onto the cake (there is a gummy Swedish Fish poking out) and I have begun preparing my white penguin bodies and the one lone snowman.  I should mention that the fondant works best when it's cold.  So keep it in the fridge, only getting out the color you're currently working with.  
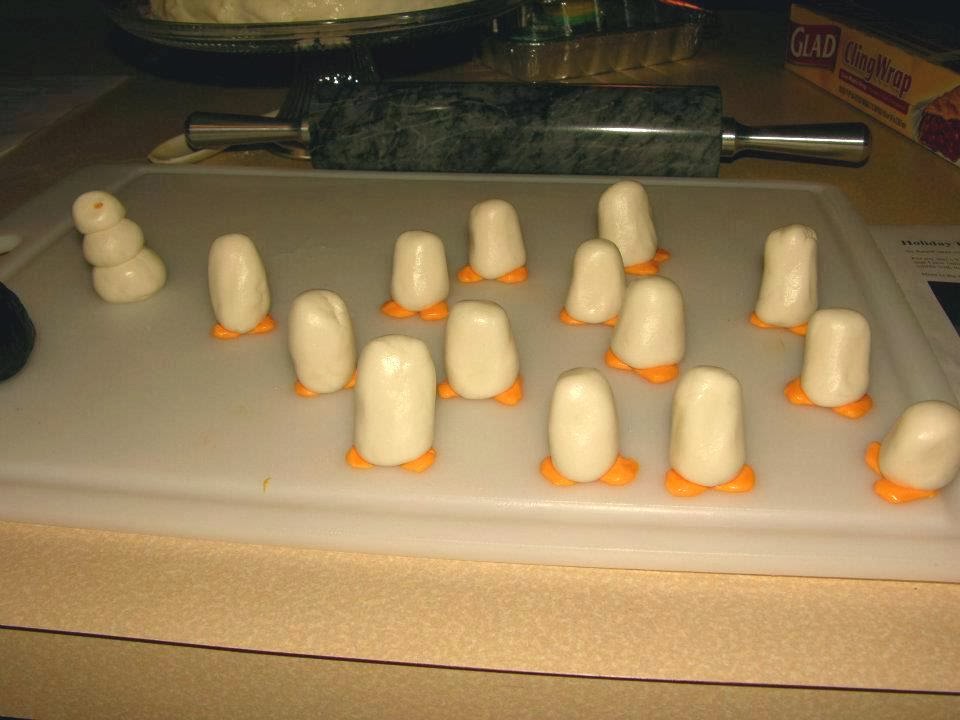
Most animals can begin with this same rounded body.  In addition to penguins, I have done tigers, elephants, dogs, monkeys, lions, alligators......  For the penguins, they were going to be standing upright so I added a couple of triangle blobs of yellow fondant to the bottom of their bodies for their feet.  Snowman also got a tiny stick of yellow fondant for his nose.  


Step 3 - Wings, Heads & Faces 
I did the penguins' backs and tails in one piece and wings in two separate pieces.  First make three long, flattish pieces with a point on one end.  I applied the back/tail pieces first, then the wings on either side and smoothed the fondant together at that point so it looks like one piece.  Round balls of black on top for their heads.  
Next I got my yellow back out and added triangles to their faces for beaks and two white balls of white for eyes.  And this is where things got crazy.  You'll want to put a few drops of black food coloring into a small dish and dip a toothpick into it to poke the eye spots onto their eyes.  
When I made this cake it was 2am the night before the birthday (or day-of, I should say) and I was the only one awake.  Putting the eye spots onto the penguins eyes gave them such funny expressions and totally brought their little characters to life.  There was giggling involved.  I know, I sound like a crazy person.  But bringing cute fondant penguins to life at 2am will do that to a person. 


Step 4 - Get creative, add them to your cake!
When I added the penguins to the cake I put some of them on their bellies so they could slide.  I only needed to reposition their heads for them to look right.  One penguin on the backside of the cake was stuck in a snowdrift, others were giving each other funny looks because of the direction I made their eyes look.  It was a very busy cake and my penguin-lover kiddo went crazy when he saw it!  You can do this!  

Want some more fondant animal inspiration??  Here's a peek at some other cakes I've made with fondant:


Have fun!


Wednesday, October 2, 2013

T-Shirt Modification Tutorial


I love learning how to do crafty things from free tutorials!  I finally decided to make one myself to show one of my favorite t-shirt modifications: boxy cut to ladies cut!  This is super easy and soon you will be digging out all those old unflattering t-shirts and taking your scissors to them.  If you have basic sewing skills you can do this! 
**If you’re buying a shirt to modify always go one or even two sizes up from what you normally wear – so you’ll have plenty of room to cut it how you want.  I recently modified one of my husband’s large t-shirts that he never wore and it turned out great so there are really no too-big shirts.

Ok, down to business.  Materials you will need:    
-a roomy t-shirt  -matching thread  -a ladies-cut shirt for a guide (optional)  -THAT’S IT! 

Step 1: (Fitting & Pinning the Sides)
If you have another ladies’ cut tee that you already love, that can be a great sizing guide (especially when we get to sleeves – but if not, don’t worry!)  Either way, I like to try on my tee first to get an idea how much I could take off on the sides.  Do this by pinching fabric on both sides starting under your arms, then mid-chest, then waistline.  I know this isn’t a very technical way to do things but I’m very visual and this helps me when I draw my new seamlines even if I do use a guide shirt.

Turn your tee inside out and lay it out flat, front side up.  If you have a guide shirt lay that out flat on top of it lining up the neckline and shoulders.  Right now we’re only concerned with the sides so forget the sleeves for the moment.  Remember how much you wanted to take off the sides when you did the pinch-estimation if you don’t have a guide tee.  With a fabric-marking pencil (or just use pins) make a rough line from the sleeve seam down to the hem and it should curve slightly inwards. 

When you have your new seams drawn, pin all the way down it.  I put my pins in one right after another (much closer than I want for sewing) because when you try on your shirt it looks more like it will when it’s sewn without any bunchy gaps from too few pins.  You can see it taking shape here.

And yes, it’s a little dicey but you must try it on to be sure you’ve got the fit right!  Make adjustments if necessary.


Step 2:  (Sleeves!)
If there’s anything worse than a boxy, regular-cut, too-big shirt, it’s the sleeves!  I can’t stand those roomy “short” sleeves that go practically down to my elbows!  I always end up rolling my sleeves up a couple of times like we did in the 80’s and it’s just not the best look. 

So, when we used our guide shirt before we centered it at the neckline to guide us in making our new side seamlines.  Now we’re going to line up the shirts starting at the sleeve hem.  When I make my new sleeves I like to keep the nice hem and cut from the other side. I’m not always the straightest hem-stitcher when it shows and really matters so if I can do my work on the inside and get a better result, that’s the way I’m going to go!  

So on the left here, you see I have lined up the shirts by the  sleeve hem.  You’ll want to take your fabric marking pencil and mark that curve between where the sleeve seam attaches to the main shirt and the hem.  Then, starting at the top, pull back a little of the guide shirt at a time marking the seamline onto your project shirt.  Then add another line about ¼” outside of that for your seam allowance as I have done (below left).

If you are doing this without a guide shirt you’re just going to have to eyeball it.  A typical cap sleeve for a shirt like this is going to be about 4” shoulder to hem.  You can see generally how to curve your line around to a point and make a straight 1-2” (underarm) line to the hem.  You could go smaller here but I wouldn’t go bigger.  Even if you don’t have a t-shirt as a guide for this part you may have a dress or other blouse that has cap sleeves if you really need something to go by. 

Next… get out your scissors!  


Step 3:  (Cutting!)

This is the moment of no return.  I always feel crazy-bold taking scissors to a finished item but this is what makes modifying clothing SO much fun!  You’re going to be cutting the sleeves off just inside the seam.


Next, cut out your new sleeves!  Since I used a guide shirt to draw the new sleeves instead of a pattern I had to lay my new sleeves on top of each other and trim them a little so they were both cut the same.  You will also want to cut a very tiny V (within your seam allowance!) in the very center of the shoulder side so you can line it up with the existing shoulder seam on the main shirt.  Mine is hard to see but it just needs to be a small notch.


Step 4:  (Sewing the Sleeves)
Ok, you’re going to pin the new sleeve (starting at the notch) to the shoulder seam (can you tell that’s it just behind my finger?) right sides together.  Continue pinning around your sleeve on either side and repeat for the other sleeve. 
Ok, we’re ready to sew!  Load up that bobbin thread and let’s get going.  When you see my sewing pictures you’re going to be curious so I’ll just start with a peek at my beautiful antique 1939 Singer 221 Featherweight sewing machine!  Partner in all of my best crafty adventures.  Love, love, love this little machine!  


In the above picture I’m stitching the shoulder seam. Below my sleeves are attached and I’m starting my side stitchline at the sleeve hem.  When I get to the underarm seam I like to stich a little back and forth to reinforce that area before turning the corner and stiching down the side of the shirt to the bottom hem.  Repeat all stitching for the other side.   


Step 5:  (Trimming Extra Fabric & Finishing Touches)

Time to turn that shirt right-side out and try it on!  If you have any adjustments to make, this is the time to make them.  Otherwise, turn your shirt back inside-out and trim off the extra fabric on the sides leaving about ¼”. 


 Now, one last modification I like to make to my new ladies-cut shirts is to fix the neckline.  The shirt I was working with had a pretty wide band around the neck and I thought it didn’t match the petite look of my trimmer shirt and shorter sleeves. 

Easy fix:  simply fold it over in half (to the inside), pin it and stitch (on the right side) right on top of the existing stitching so it’s invisible (“stitch in the ditch”). 

This gives you a slightly larger neck opening while still keeping that professional store-made look!  


That’s it!  5 easy steps and one afternoon and you’ve got a much more flattering shirt to wear (I got two at once)!


Happy sewing!    


p.s.  These great homeschool shirts came from Great Products!  ♥